SPECsfs2008
User’s Guide
Standard Performance Evaluation
Corporation (SPEC)
6585 Merchant
Place, Suite 100
Warrenton, VA
20187, USA
Phone: 540-349-7878
Fax: 540-349-5992
E-Mail: info@spec.org
www.spec.org
Copyright (c) 2008 by Standard Performance Evaluation Corporation (SPEC)
All rights reserved
SPEC and SFS are registered trademarks of the Standard Performance Evaluation Corporation
NFS is a registered trademark of Sun Microsystems, Inc.
Table of Contents
1.3 Editing the
configuration file on the Prime client
1.4 Configuring the
server for testing
1.6 Monitoring the
benchmark execution
1.7 Examining the results
after the benchmark execution has completed
2.1 What is new in
SPECsfs2008
2.2 SPECsfs2008 Benchmark
Overview
2.2.3 Comparing the NFS and
CIFS Workloads
3 Installing and Configuring the
Benchmark Environment
3.1 Setting up the System
Under Test (SUT)
3.2 Setting up the Load
Generators
3.2.1 Configuring SFS2008
Windows Clients for Auto-Startup
3.3 Configuring the Required
Benchmark Parameters
3.3.1 Other Variables in the
RC File
4 Running the Benchmark and
Interpreting Results
4.1 SFS Benchmark
Directory Structure
4.2 Pre-Compiled SFS
Benchmark Binaries
4.3.1 Example of SUT
Validation
4.3.2 Example of a Benchmark
Run
4.4 Interpreting the
Benchmark Results
5 Submission and Review Process
5.1.1 Creating the Submission
File
5.1.2 Creating the Submission
Reports
5.1.3 Submit Tools Example
Files
5.1.4 Submit Tools Example
Scenarios
5.1.5 Translation of
Free-Form Fields
6.1 SPECsfs2008 Benchmark
Press Release
6.2 Running and
troubleshooting the benchmark
9 Appendix A – Building SFS Benchmark
Components
9.2.1 Update Visual Studio
Libraries/Includes
9.2.2 Open the Visual Studio
workspace files
9.2.3 Build the individual
project files
9.2.4 Debugging with Visual
Studio
9.4 Building the Result
Submission Tools
10 Appendix B – Setting up password-less
ssh
1
Quick Start Guide
The SPECsfs2008 benchmark is used to measure the performance of an NFS or CIFS server. It creates a mixed workload that simulates a typical server environment. The user may use the tool to measure the performance of an NFS or CIFS server and compare the results with other servers that have results published on the SPEC web site.
SPECsfs2008 results summarize the server’s capabilities with respect to the number of operations that can be handled per second, as well as the overall latency of the operations. A minimal SPECsfs2008 result will contain ten load points and the results of the server at each of the requested load points. Each load point presents a requested number of operations per second.
The benchmark requires that the user have one or more client systems that can be used to generate load on the server. One of these clients, referred to as the ‘prime’ client, is used to coordinate all the load-generating clients (the prime client itself is eligible, but not required, to generate load).
Example
topology
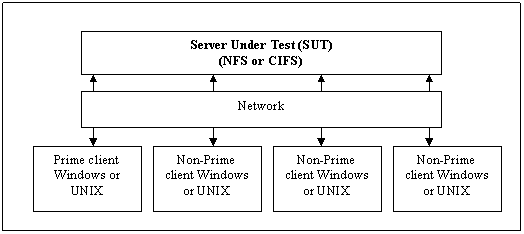
The minimal configuration consists of one load generating client, and one NFS or CIFS server. The server is often referred to as the SUT (Server Under Test) in the documentation below.
The steps to produce a SPECsfs2008 result are:
· Install SPECsfs2008 on the load generators
· Edit the configuration file on the prime client
· Configure the server for testing
· Start the benchmark
1.1
Prerequisites
· The Java RunTime Environment (jre) release 1.5 or later must be installed on the load generator (client) and Prime Client systems.
· The J2SE(TM) Development Kit release 5.0 or later must be installed on the system(s) where you want to build the java code in the benchmark (not normally required)
· The correct java program must be in the current user’s path.
· The test file systems (exported via NFS V3 or as CIFS shares) must have the permissions set correctly in order to allow access and read/write operations by the clients. The test file systems do not need to be mounted or mapped prior to execution of the benchmark.
· There must be network connectivity between the SUT (System Under Test) and clients, and between the clients and the Prime Client. The Prime Client is simply the system on which the benchmark run is started, and could be one of the clients or the SUT.
· The contents of the SPECsfs2008 benchmark CD must be accessible on all the systems where the benchmark will be installed.
· Using these quick start procedures assumes that the pre-compiled C code binaries shipped with the benchmark will be used.
1.2
Installing SPECsfs2008
SPECsfs2008 can be installed on client machines running either a UNIX-based or Windows operating system. Each of these require slightly different configuration and are described separately below.
UNIX client installation and configuration:
· Ensure that DNS is correctly configured.
· Install Java 1.5 or later, and ensure that java is in the user’s search path. UNIX versions of Java may be downloaded from http://www.java.com.
· Install SPECsfs2008 benchmark using the following steps:
o Login to the client (as root)
o Insert the SPEC CD-ROM and mount the CD-ROM device.
o cd to the top level CD-ROM directory
o Enter ‘cd spec-sfs2008/manager’
o Enter ‘java SpecInstall “destination_directory”’ (where “destination_directory“, enclosed by double-quotes, is where you wish to have the benchmark installed)
Windows
client installation and configuration:
· Ensure that Windows Internet Naming Service (WINS) is correctly configured.
· Install Java 1.5 or later, and ensure that java is in the user’s search path. Windows versions of Java may be downloaded from http://www.java.com
· Install SPECsfs2008 benchmark
o Start a command prompt window (DOS type command shell). This can be done using the ‘Start’ button, choosing ‘Run…’ and entering ‘cmd’.
o Insert the SFSsfs2008 CD-ROM and enter the drive letter associated with the CD-ROM device (eg. D:) at the command prompt.
o Enter ‘chdir spec-sfs2008\manager’
o Enter ‘java SpecInstall ‘“destination_directory”’ (where “destination_directory”, enclosed by double-quotes, is where you wish to have the benchmark installed)
Note:
If one is running SPECsfs2008 on a Windows workstation client. (non-server
version of Windows) then one must disable the Windows file server component before using the client
to run the SPECsfs2008 benchmark. This is accomplished by using a command
window and running:
net stop server
This
applies to all non-server versions of Windows (NT, XP, Win2k, and
1.3
Editing the configuration file on the Prime client
On the Prime client, copy one of the sfs ‘rc file’ templates (sfs_nfs_rc for NFS, sfs_cifs_rc for CIFS) in the manager directory into a file called sfs_rc. The user must edit the sfs_rc configuration file, and only needs to edit it on one of the clients. The client that contains the edited configuration file must be the Prime client. The user does not need to edit, or even have, a configuration file on the other load generating clients. On the Prime client, edit the values for:
o
LOAD
Initial value for requested operations/sec, or a complete list of the data
points to be collected by the benchmark. Examples are provided in the
sfs_nfs_rc and sfs_cifs_rc template files, which are located in the manager
directory.
o
INCR_LOAD
Incremental increase in load for successive data points in a run. This parameter is used only if LOAD consists of a single (initial)
value. To ensure equally spaced points,
the value of LOAD and INCR_LOAD must be equal.
o
NUM_RUNS
The number of load points to run and measure (minimum of 10 for a publishable
result). This parameter is used only if INCR_LOAD is specified.
o
PROCS
Number of processes per client. Each client load generator may be able to
generate more load if the client has sufficient resources to do so. A general rule of thumb is to have the total
requested load be divided across all of the clients, and to have sufficient
numbers of clients and processes so as to have the operations/sec per process remain
below 250 at the highest load point. It
is also recommended to have the operations/sec per process remain above 10 at
the lowest load point.
o
CLIENTS
List of clients to use in this test. The Prime client, if listed here, may also
be used to generate load. If the Prime client is not listed here then it will
only coordinate the testing and will not participate in generating load. The client names in this list are hostnames or
IP addresses of the clients that will be participating in generating the load.
o
MNT_POINTS
List of mount points, or shares, to use in the testing. Each of these mount points must be exported by the server so that they may be mounted by the load generating clients. The value MNT_POINTS can take several different forms:
§ UNIX style: server:/exportfs1 server:/exportfs2 …
§ CIFS style: \\server\exportfs1 \\server\exportfs2 …
§
Use a file that contains the mount points: filename
The use of a file, and its format, is covered later in this document.
The number of mount points in the list must be equal to number of processes specified in the PROCS parameter. Note that a mount point may be repeated in the list.
o
FS_PROTOCOL
The type of server protocol (NFS or CIFS) to
test. It may be set to “nfs” or “cifs”. Either
UNIX or Windows clients can be used to test either NFS or CIFS, however, all
clients must be of the same type. Note:
If this value is set to “nfs” then the MNT_POINTS list must use the UNIX
style syntax. If this value is set to “cifs” then the MNT_POINTS list must use
the CIFS style syntax.
When testing a CIFS configuration:
o
USERNAME Specify
the CIFS user name for accessing the server.
o
PASSWORD Specify
the CIFS password for accessing the server.
o
DOMAIN Specify
the CIFS domain for accessing the server.
When
testing an NFS configuration from a Windows client:
o
SFS_NFS_USER_ID Specify the NFS server user ID to be used.
o
SFS_NFS_GROUP_ID Specify the NFS server group ID to be used.
1.4
Configuring the server for testing
· Export or share file systems that will be used for testing (export for UNIX, or enable Shared folders for Windows). The exported name must match the values specified in the MNT_POINTS variable in the SPECsfs2008 configuration file.
· Ensure the exported file systems have read/write permissions.
· Ensure access is permitted for username, password, and domain. (CIFS testing only)
1.5
Starting the benchmark
Note that the SfsManager must be run under the same user id (UID) on the all of the clients, including the prime client.
· Change directories to the destination_directory specified during install.
· On the Prime client:
o Enter ‘cd manager’
o
Enter ‘java SfsManager –r sfs_config_file –s
output_files_suffix –v 2’
(This performs the server validation)
o
Enter ‘java SfsManager –r sfs_config_file –s
output_files_suffix’
(This runs the actual test)
1.6
Monitoring the benchmark execution
· On the Prime client, change directories to the destination_directory from the installation step above by entering ‘cd result’
The user may now examine the benchmark logs, as well as the results. As the benchmark runs, the results are stored in the files with names like:
sfssum.* Summary file used in the submission process described later.
sfslog.* Log file of the current activity.
sfsres.* Log file of the current activity.
During the run, each client will store its client log file ‘sfsc_log’ in its local /tmp directory. After all load points are complete, the files from each client are collected into the result directory on prime client and renamed with the client number. The client logs are files with names like: sfsc0001.*
sfsc*.* The client log files.
1.7
Examining the results after the benchmark execution
has completed
The results of the benchmark are summarized in the sfssum.* file in the result directory on the prime client. This may be examined with any text editing software package. This file is the summary file that may be used for the submission process, described later in this document.
2
Introduction
SPECsfs2008 is the latest version of the Standard Performance Evaluation
Corporation benchmark that measures file server throughput and response time.
It provides a standardized method for comparing performance across
different vendor platforms.
This document specifies how SPECsfs2008 is to be run for measuring
and publicly reporting performance results, and includes a guide to using the
SFS tools. The SPECsfs2008 Run and Reporting Rules (included in a
separate companion document on the SPECsfs2008 CD) have been established by the
SPEC SFS Subcommittee and approved by the SPEC Open Systems Steering Committee.
They ensure that results generated with this suite are meaningful, comparable
to other generated results, and are repeatable. Per the SPEC license agreement,
all results publicly disclosed must adhere to these Run and Reporting Rules.
SPEC requires that any public use of results from this benchmark follow the SPEC OSG Fair Use
Policy.
In the case where it appears that these guidelines have not been adhered to,
SPEC may investigate and request that the published material be corrected.
The section below describes the changes in SPECsfs2008 compared
to the previous version of the benchmark, SFS 3.0.
2.1
What is
new in SPECsfs2008
The SPECsfs2008 release of the benchmark includes major workload and functionality changes, as well as clarification of run rules. The code changes compared to earlier SFS versions were NOT performance neutral, therefore comparing SPECsfs2008 results with SFS 3.0 results is NOT allowed.
The most significant areas of change in SPECsfs2008 include:
- An updated NFSv3 workload, based on recent data collected by SFS committee members from thousands of real NFS servers operating at customer sites.
- The addition of a general-purpose CIFS fileserver workload, also developed using data collected from thousands of real CIFS servers.
- Removal of support for the NFSv2 and support for the UDP transport.
- Support for Windows and MacOSX clients (for generating either NFS or CIFS workloads).
- A new java-based SFS manager test harness.
- A new XML based reporting and submission framework.
- Simplified and better organized documentation.
- Significant improvements to benchmark stability and error handling.
2.2
SPECsfs2008
Benchmark Overview
The SPECsfs2008 benchmark is used to test the performance capacity of NFS and CIFS fileservers. Performance is measured in both in terms of throughput (the number of operations the server can serve) as well as the response time (time required to complete individual operations).
In a typical SFS test configuration, a series of load generating clients are directed through a network at file systems shared or exported from the ‘server under test’ or SUT. Clients are directed by the SFS manager program to execute a series of ten or more tests at increasing, equally spaced ‘load points’. A load point represents a throughput level (number of operations) for the workload the SFS clients will present to the server. At the end of each load point, the clients will report how much throughput was actually achieved, as well as the average response time for all requests presented to the server during the measurement interval. The benchmark reporting tools can be used after the full run is complete to present the peak achieved throughput as well as calculate an ‘overall response time’ metric, which is meant to reflect the results of average response time measurements across the series of load points (essentially it is the area under the throughput vs. average response time curve).
At the start of each load point each client will start a specified number of load generating processes. Each process will mount the exported or shared file systems, create a directory structure, and fill it with a series of files of various sizes. The number of files the load generating process creates is determined by and increases proportionally with the number of operations per second specified for the given load point.
When all load generating processes have completed the initialization of the fileset (known as the ‘INIT’ phase of the benchmark), they will begin to request from the server a series of NFS or CIFS operations based on the workload parameters established by the benchmark. The load generators will spend 300 seconds running in WARMUP mode, where no official measurements are recorded. After the WARMUP phase is completed, the benchmark will start a 300 second measurement phase, where the actual measurement of throughput and response time for the load point is collected.
Upon successful completion of the 300 second measurement
period, statistics from all load generators on all clients are collected and
centralized by the SFS manager program, which will report and record the
overall results of the test. If the test completes without violating any
benchmark rules, the summary report produced by the SFS manager may be used to
produce an SFS submission which can be sent to SPEC for review and publication.
In the following subsections, some additional specifics regarding the NFS and CIFS workloads are provided.
2.2.1
NFS Workload
The NFS workload in SPECsfs2008 is intended for servers which can serve the NFS version 3 protocol over the TCP transport. Support for NFS version 2 and the UDP transport are no longer officially supported by the benchmark.
In many ways, the workload in SPECsfs2008 is similar to the workload presented by SFS 3.0. However, there are a number of changes that significantly alter the effect the workload is likely to have on the server under test. These changes were mainly driven by the need to adapt the original benchmark to changes that have occurred in real NFS server configurations, file sets, and workload patterns in the years since the last benchmark was released. Here is a list of the most significant changes made to the NFS workload for SPECsfs2008.
ü The percentage of each NFS operation has been adjusted to better reflect more recent data collected on real NFS servers. A table later in this section summarizes the adjustments.
ü The maximum file size was increased from 1 Megabyte to 32 Megabytes.
ü The total file set size created for a given load point has been increased from 10 Megabytes per SFS op/s to 120 Megabytes per SFS op/s
ü The percentage of files in the file set accessed during the test was increased from 10 percent to 30 percent.
ü The maximum logical transfer size was increased from 135 Kilobytes, to 256 Kilobytes.
ü The NFS block (physical transfer) size was previously fixed at 8 Kilobytes. It is now automatically negotiated with the server.
ü COMMIT
operations are no longer issued if the server returns the STABLE bit on the
write operations. When a server returns an UNSTABLE response to a write
operation, a COMMIT may be issued after a number of WRITE operations are
issued. Previously, the benchmark would issue a COMMIT after every logical
write operation was completed, regardless of whether or not the operation was
STABLE. This was determined to not reflect the behavior observed by real
client/server interactions.
The shift in NFS operations is outlined in the table below comparing the NFS operation mix in SFS 3.0 and SPECsfs2008. Note that the percentage of READ and WRITE operations in SPECsfs2008 are now expressed as ‘logical’ operations. This is because the number of physical IOs required to complete the logical read or write may vary depending on the transfer size negotiated between the SFS client and the server under test. Also note that COMMITs are no longer included in the op mix and are not counted as completed operations in the benchmark result. When required due to UNSTABLE write responses from the server, COMMITs will be issued and the time required to complete the COMMIT will be included in the response time measurement for the logical write which required it. In effect, COMMIT operations are ‘overhead’ for which no credit is given in situations when they are required by the nature of the server response.
|
NFS Version 3 Operation |
SPECsfs2008 |
SPEC SFS 3.0 |
|
LOOKUP |
24% |
27% |
|
READ |
18% |
18% |
|
WRITE |
10% |
9% |
|
GETATTR |
26% |
11% |
|
READLINK |
1% |
7% |
|
READDIR |
1% |
2% |
|
CREATE |
1% |
1% |
|
REMOVE |
1% |
1% |
|
FSSTAT |
1% |
1% |
|
SETATTR |
4% |
1% |
|
READDIRPLUS |
2% |
9% |
|
ACCESS |
11% |
7% |
|
COMMIT |
NA |
5% |
2.2.2
CIFS Workload
The CIFS workload in SPECsfs2008 shares the file set attributes with the NFS workload. However, the operations applied to the server under test are, of course, quite different. As with NFS, a study of thousands of CIFS servers deployed at customer sites was used to determine a target operation mix. CIFS, however, is a ‘stateful’ protocol, which implies that operations must be delivered in valid sequences. For example, a file must be opened before certain operations can be issued to the server, and closed after those operations are completed. Clearly, delivering operations in a random succession, as is done with the ‘stateless’ NFS workload, would not work.
To overcome the more restrictive requirements of CIFS, as well as to improve the realism of the CIFS workload, an operation generation technique utilizing a Hidden Markov Model (HMM) was developed for SPECsfs2008. Real CIFS traces collected from active CIFS servers were used to train the model, and the resulting CIFS workload reflects the valid operation sequences exhibited in the original traces.
The operation mix produced by the SPECsfs2008 CIFS workload is captured in the table below.
|
CIFS Operations |
SPECsfs2008 |
|
ECHO |
0.5% |
|
LOCKING_ANDX |
1.1% |
|
NT_TRANSACT_QUERY_SECURITY_DESC |
1.6% |
|
READ_ANDX |
20.5% |
|
TRANS2_QUERY_FS_INFORMATION |
1.6% |
|
TRANS2_QUERY_FILE_INFORMATION |
12.9% |
|
TRANS2_QUERY_PATH_INFORMATION |
21.5% |
|
TRANS2_SET_FILE_INFORMATION |
3.2% |
|
TRANS2_FIND_FIRST2 |
8.6% |
|
WRITE_ANDX |
8.6% |
|
NT_CREATE_ANDX |
9.7% |
|
CLOSE |
9.7% |
|
FLUSH |
0.5% |
2.2.3
Comparing the NFS and CIFS Workloads
While there are some similarities, especially with respect to the file sets each workload operations on, the NFS and CIFS workloads are not comparable and no conclusions about the ability of a given SUT to perform NFS versus CIFS operations should be made by comparing the NFS and CIFS results for that SUT. For example, if the CIFS results for an SUT are 20% higher than the NFS results for the same SUT, it should not be inferred that the SUT is ‘better’ at delivering CIFS operations than NFS operations. The workloads are very different and no attempt was made to normalize the NFS and CIFS workloads. The only valid comparisons that can be made are between published results for different SUTs operating against the same SPECsfs2008 workload, either NFS or CIFS.
3
Installing
and Configuring the Benchmark Environment
This section provides information on hardware/software configuration requirements for the load generators and the file servers (CIFS and NFS). It also includes installation instructions for the benchmark on the load generators for each of the supported operating systems.
3.1
Setting up
the System Under Test (SUT)
There are several things you must set up on your server before you can successfully execute a benchmark run.
1. Configure enough disk space. SPECsfs2008 needs 120 MB of disk space for each NFS or CIFS ops/sec you will be generating, with space for 10% growth during a typical benchmark run (10 measured load levels, 5 minutes per measured load). You may mount your test disks anywhere in your server's file space that is convenient for you. The maximum NFS or CIFS ops/sec a server can process is often limited by the number of independent disk drives configured on the server. In the past, a disk drive could generally sustain on the order of 100-200 NFS or CIFS ops/sec. This was only a rule of thumb, and this value will change as new technologies become available. However, you will need to ensure you have sufficient disks configured to sustain the load you intend to measure.
2. Initialize and mount all file systems. According to the Run and Reporting Rules, you must completely initialize all file systems you will be measuring before every benchmark run. On UNIX systems, this is accomplished with the “newfs” command. On a Windows system the “FORMAT” utility may be used. Just deleting all files on the test disks is not sufficient because there can be lingering effects of the old files (e.g. the size of directory files, location of inodes on the disk) which affect the performance of the server. The only way to ensure a repeatable measurement is to re-initialize all data structures on the disks between benchmark runs. However, if you are not planning on disclosing the result, you do not need to perform this step.
3. Export or share all file systems to all clients. This gives the clients permission to mount, read, and write to your test disks. The benchmark program will fail without this permission.
4. Verify that all RPC services work. The benchmark programs use port mapping, mount, and NFS services, or Microsoft name services, and file sharing, provided by the server. The benchmark will fail if these services do not work for all clients on all networks. If your client systems have NFS client software installed, one easy way to do this is to attempt mounting one or more of the server's exported file systems on the client. On a Windows client one may try mapping the shares to ensure that the services are correctly configured on the CIFS server.
5. NFS servers generally allow you to tune the number of resources to handle TCP requests. When benchmarking using the TCP protocol, TCP support is of course required, and you must also make sure that UDP support is at least minimally configured or the benchmark will fail to initialize.
6. Ensure your server is idle. Any other work being performed by your server is likely to perturb the measured throughput and response time. The only safe way to make a repeatable measurement is to stop all non-benchmark related processing on your server during the benchmark run.
7. Ensure that your test network is idle. Any extra traffic on your network will make it difficult to reproduce your results, and will probably make your server look slower. The easiest thing to do is to have a separate, isolated network between the clients and the server during the test. Results obtained on production networks may not be reproducible. Furthermore, the benchmark may fail to correctly converge to the requested load rate and behave erratically due to varying ambient load on the network.
At this point, your server should be ready for a benchmark measurement. You must now set up a few things on your client systems so they can run the benchmark programs.
3.2
Setting up the Load Generators
Running the SfsManager requires that the Java Runtime Environment (JRE) release 5.0 or later be loaded on the system. You can get the JRE package from www.java.com.
- On UNIX systems, create “spec” user. SPECsfs2008 benchmark runs should be done as a non-root user.
- The SPECsfs2008 programs must be installed on clients.
To install the SPECsfs2008 programs:
On all the clients:
Login as “root”
Enter ‘cd cdrom_directory/manager’
Enter ‘java SpecInstall “destination_directory”’
- On UNIX systems, ensure sfsnfs3 is setUID root, if necessary. Some NFS servers only accept mount requests if sent from a reserved UDP or TCP port, and only the root user can send packets from reserved ports. Since SPECsfs2008 generally is run as a non-root user, the sfsnfs3 program must be set to execute with an effective UID of root.
- To get the benchmark to use a reserved port, you must include a -DRESVPORT option in your compile command. This is easiest to accomplish by editing the Makefile section in which compiler options for the specific operating system used on your client systems. The build process will then make the client use a reserved port and will arrange to run the benchmark programs as root. However, you may want to verify this works the first time you try it.
- Configure and verify network connectivity between all clients and server. Clients must be able to send IP packets to each other and to the server. How you configure this is system-specific and is not described in this document. Two easy ways to verify network connectivity are to use a “ping” program or the netperf benchmark (http://www.netperf.org).
- Before starting the benchmark, ensure that the prime client can execute commands on the remote clients using ssh with no password challenges. Refer to Appendix B for an example of how to do this.
- If clients have NFS client code, verify they can mount and access server file systems. This is another good way to verify your network is properly configured. You should unmount the server's test file systems before running the benchmark. If configuring SPECsfs2008 to test CIFS, one can test that the clients can map the shares. You should un-map the shares before running the benchmark.
- The Prime Client must have sufficient file space in the SPECsfs2008 file tree to hold the result and log files for a run. Each run generates a log file of 10 to 100 kilobytes, plus a result file of 10 to 100 kilobytes. Each client also generates a log file of one to 10 kilobytes.
* IMPORTANT * -- If Windows Firewall is turned on; each program will need to be added to the exceptions list. Either open the Windows Firewall control panel and add the applications manually, or wait for the pop-up to appear after the first execution of each application. Other locally-based firewall applications may require a similar allowance.
3.2.1
Configuring SFS2008 Windows Clients for Auto-Startup
The following are the steps to follow to configure Windows clients in order to allow the Prime Client to communicate with them directly and remotely start the SfsManager process when a benchmark run is started.
Granting DCOM Remote Launch permissions:
1. Click Start, click Run, type DCOMCNFG, and then click OK.
2. In the Component Services dialog box, expand Component
Services,
expand
Computers.
3. Right mouse click on My Computer and select properties.
The My Computer dialog box appears.
4. In the My Computer dialog box, click the COM Security
tab.
5. Under Launch and Activate Permissions, click Edit
Limits.
6. In the Launch Permission dialog box, follow these steps
if your
name or your group
does not appear in the Groups or user names list:
a. In the Launch Permission dialog box, click
Add.
b. In the Select Users, Computers, or Groups
dialog box,
add your name
and the group in the Enter the object names to
select box,
and then click OK.
7. In the Launch Permission dialog box, select your user and
group in
the Group or user
names box. In the Allow column under Permissions
for User, select
Remote Launch, and then click OK.
3.3
Configuring the Required Benchmark Parameters
Once you have the clients and server configured, you must set some parameters for the benchmark itself, which you do in a file called the “rc file”. The actual name of the file is a prefix picked by you, and the suffix “_rc”. The default versions shipped with the benchmark are delivered as “sfs_nfs_rc” and “sfs_cifs_rc” in the benchmark source directory. One may use any text editor to modify parameters in the rc files. Please note that any variable which is a list of values must have its value enclosed in double quotes.
There are several parameters you must set, and several others you may change to suit your needs while performing a disclosable run. There are also many other parameters you may change which change the benchmark behavior, but lead to an undisclosable run (for example, turning on debug logging). See the SPECsfs2008 Run Rules for the classification of all the parameters.
The parameters you must set are:
- MNT_POINTS: This parameter specifies the names of the file systems the clients will use when testing the server. It can take two forms.
The first form is a list of host:path pairs specifying the file systems this particular client will be using. For example, if the server is named “testsys” and has three test mount points named “/test1”, “/test2”, and “/test3”, the list would be “testsys:/test1 testsys:/test2 testsys:/test3”, for an NFS configuration, and \\testsys\test1 \\testsys\test2 \\testsys\test3 for a CIFS configuration. You must be very careful when specifying the mount point to comply with the uniform access rule (see below). The second form is simply the name of a file containing a list of mount points for each client. The format of the file is:
For an NFS configuration:
client_name server:path server:path...
client_name server:path server:path...
For a CIFS configuration:
client_name \\server\path \\server\path…
client_name \\server\path \\server\path…
And so on, one line for each client system. This file gets stored in the “manager” directory, the same place as the rc file.
NOTE: The mount points file must be stripped of carriage-return line-feeds. For example, on Linux vi, use the “:set filemode=unix” option when editing this file.
- LOAD, INCR_LOAD, and NUM_RUNS: These parameters specify the aggregate load the clients will generate. You can specify the load points two ways:
• You can explicitly specify a list
of load levels in LOAD. So, if you want to test a load of 100, 300, and 700
NFSops, you would set LOAD to “100 300 700".
•
If you want to test a set of evenly spaced load points, set all three
parameters. Set LOAD to the lowest load level, set INCR_LOAD the amount you
would like to increase the load for each measured run, and set NUM_RUNS to the
number of times you would like to increment the load. This is the easiest way
to configure a disclosable run.
For example, if you would like to measure 10 evenly spaced points ending at 2000 NFSops, you would set LOAD to 200, INCR_LOAD to 200, and NUM_RUNS to 10. If CLIENTS is 4 and NUM_PROCS is 8, note that due to rounding that occurs within the benchmark code, this will result in load points of 192 384 576 800 992 1184 1376 1600 1792 1984.
- CLIENTS: This is the names of all the client systems you will use to load your server. If you will be generating load with the prime client, include it on this list.
- NUM_PROCS: This is the number of load generating processes (“procs”) you want to run on each client system. As you add procs, you can have more operation requests outstanding at any given time, and you can use more file systems on the server, all of which tends to increase the load your server can process (until either the disks or the processors run out of capacity).
There is a relationship between the value of PROCS, CLIENTS and MNT_POINTS. The number of mount points specified in MNT_POINTS must equal the value of PROCS, or equal the value of PROCS times the number of clients in CLIENTS. In the first case, each mount point will be accessed by one proc on each client. In the second case, each listed mount point will be accessed by exactly one proc on one client. The first PROC mount points will be used by the first client, the second PROC mount points by the second client, and so forth.
You may specify the same mount point multiple times in MNT_POINTS. This allows you to have more than one process accessing a given file system on the server, without having all clients loading that file system. If a file system traverses multiple disks, (Example RAID Level 0, 1 …), then care must be taken to conform to the uniform access rule.
- FS_PROTOCOL: Set this to NFS or CIFS, which are the only supported protocols.
- USERNAME: Set this to the user account name for the CIFS share. (CIFS testing only)
- PASSWORD: Set this to the user’s password for the CIFS share. (CIFS testing only)
- DOMAIN: Set this to the correct CIFS domain. (CIFS testing only)
There are many other parameters you can modify in the rc file, but generally none are necessary. They allow you to change the NFS operation mix, change run duration parameters, or turn on debugging information.
3.3.1
Other Variables in the RC File
As mentioned above, there are many more parameters you can set in the RC file. Here is the list and what they do:
- TCP:
Leave it unset, or set it to 1 or “on” to use TCP to communicate between
the clients and the server. UDP is
not supported.
- BIOD_MAX_READS
and BIOD_MAX_WRITES: SPECsfs2008 emulates the read-ahead and
write-behind behavior of NFS block I/O daemons. These allow a client to
have multiple read and write requests outstanding at a given time.
BIOD_MAX_READS and BIOD_MAX_WRITES configure how many read or write
operations SPECsfs will transmit before stopping and waiting for replies.
You can set these to any value from 0 to 32, inclusive. (NFS testing only)
- SFS_DIR and WORK_DIR: These are the directory names containing the SPECsfs2008 programs (SFS_DIR), the RC file, and logging and output files (WORK_DIR). If you configure your clients with the same path for these directories on all clients, you should not need to fool with this. One easy way to accomplish this is to export the SFS directory tree from the prime client and NFS mount it, or for CIFS map the share, at the same place on all clients.
- PRIME_MON_SCRIPT and PRIME_MON_ARGS: This is the name (and argument list) of a program which SPECsfs will start running during the measurement phase of the benchmark. This is often used to start some performance measurement program while the benchmark is running so you can figure out what is going on and tune your system.
Look at the script “sfs_ext_mon” in the SPECsfs2008 source directory for an example of a monitor script.
- WARMUP_TIME and RUNTIME: These set the duration of the warmup period and the actual measurement period of the benchmark.
- INIT_TIMEOUT: The maximum time (in seconds) that the benchmark will run during the working set initialization phase for a single data point before timing out. This value may be increased as needed, e.g., when using a slow I/O subsystem, in order to keep the benchmark from timing out during initialization.
- BLOCK_SIZE: The maximum block (RPC) size which the load generators will use for network communication with the NFS server. If this value is not set, the load generators will auto-negotiate the block size with the server based on the server’s advertised preferred size. (NFS testing only)
- MIXFILE: This specifies the name of a file in WORK_DIR which describes the operation mix to be executed by the benchmark. This capability is only available for NFS testing configurations.
Look in the file sfs_c_man.c near the function setmix() for a description of the mix file format. The easiest to use format is as follows:
SFS MIXFILE VERSION 2
opname xx%
opname yy%
# comment
opname xx%
The first line must be the exact string “SFS MIXFILE VERSION 2" and nothing else. The subsequent lines are either comments (denoted with a hash character in the first column) or the name of an operation and it's percentage in the mix (one to three digits, followed by a percent character). The operation names are: null, getattr, setattr, root, lookup, readlink, read, wrcache, write, create, remove, rename, link, symlink, mkdir, rmdir, readdir, fsstat, access, commit, fsinfo, mknod, pathconf, and readdirplus. The total percentages must add up to 100 percent.
- ACCESS_PCNT:
This sets the percentage of the files created on the server which will be
accessed for I/O operations (i.e. will be read or written).
- DEBUG: This turns on debugging messages to help you understand why the benchmark is not working. The syntax is a list of comma-separated values or ranges, turning on debugging flags. A range is specified as a low value, a hyphen, and a high value (e.g. “3-5” turns on flags 3, 4, and 5), so the value “3,4,8-10” turns on flags 3, 4, 8, 9, and 10.
To truly understand what gets reported with each debugging flag, you need to read the source code. The messages are terse, cryptic, and not meaningful without really understanding what the code is trying to do. Note the child debugging information will only be generated by one child process, the first child on the first client system.
Table 3. Available values
for the DEBUG flags:
|
Value |
Name of flag |
Comment |
|
1 |
DEBUG_NEW_CODE |
Obsolete and unused |
|
2 |
DEBUG_PARENT_GENERAL |
Information about the parent process running on each client system. |
|
3 |
DEBUG_PARENT_SIGNAL |
Information about signals between the parent process and child processes |
|
4 |
DEBUG_CHILD_ERROR |
Information about failed NFS or CIFS operations |
|
5 |
DEBUG_CHILD_SIGNAL |
Information about signals received by the child processes |
|
6 |
DEBUG_CHILD_XPOINT |
Every 10 seconds, the benchmark checks it's progress versus how well it's supposed to be doing (for example, verifying it is hitting the intended operation rate). This option gives you information about each checkpoint |
|
7 |
DEBUG_CHILD_GENERAL |
Information about the child in general |
|
8 |
DEBUG_CHILD_OPS |
Information about operation starts, stops, and failures |
|
9 |
DEBUG_CHILD_FILES |
Information about what files the child is accessing |
|
10 |
DEBUG_CHILD_RPC |
Information about the actual RPCs generated and completed by the child |
|
11 |
DEBUG_CHILD_TIMING |
Information about the amount of time a child process spends sleeping to pace itself |
|
12 |
DEBUG_CHILD_SETUP |
Information about the files, directories, and mix percentages used by a child process |
|
13 |
DEBUG_CHILD_FIT |
Information about the child's algorithm to find files of the appropriate size for a given operation |
4
Running the Benchmark and Interpreting Results
This section contains information on the SFS benchmark
directory structure, running the benchmark, and interpreting the benchmark
metrics output generated in the summary results file.
4.1
SFS Benchmark Directory Structure
The following is a quick overview of the benchmark’s directory structure. Please note that the variable “$SPEC” used below represents the full path to the install_directory, where the benchmark is installed.
- $SPEC
The directory contains the SFS benchmark Makefile. The SFS benchmark uses the UNIX “Makefile” structure to build tools, compile the benchmark source into executables, and to clean directories of all executables. However, note that pre-built binaries for several operating systems, and therefore compilation should not be required in most cases.
- $SPEC/bin
The benchmark binaries for the specific environment being used are located in the “$SPEC/bin” directory if the user has built the binaries using the Makefile provided..
- $SPEC/binaries
The benchmark pre-built binaries for various operating systems are located in subdirectories under the “$SPEC/binaries” directory.
- $SPEC/documents
The benchmark documentation is located under the “$SPEC/documents” directory.
- $SPEC/manager
Both the SFS default and user modified _rc files are located in the “$SPEC/manager” directory. These files contain the parameter values to be used by the SFS Manager (SfsManager) for benchmark execution. The SfsManager is also located in this directory.
- $SPEC/redistributable_sources
Source code which is being used within the benchmark under the terms of the GNU Lesser General Public License is located under the “$SPEC/redistributable_sources” directory.
- $SPEC/result
The benchmark log and results files created during a benchmark run are located in the “$SPEC/result” directory.
- $SPEC/src
The benchmark source code is located under the “$SPEC/src” directory.
- $SPEC/submit_tools
The tools for generating a benchmark result submission file which can submitted for SPEC review are located under “$SPEC/submit_tools”.
4.2
Pre-Compiled SFS Benchmark Binaries
Included in this benchmark release are pre-compiled versions of the benchmark for various operating systems at various levels. If it becomes necessary for the user to compile a version of the benchmark source for testing, a generic UNIX makefile is provided in the benchmark top level directory ($SPEC). This top level makefile will determine the target during its execution, and build the appropriate executables for the target system.
The makefile may be modified or supplemented in a performance neutral fashion to facilitate the compilation and execution of the benchmark on operating systems not included within the benchmark distribution.
The Visual Studio workspace files are also provided should one need to rebuild the Windows executables. The workspace files are located in the src/win32 subdirectory. Building SPECsfs2008 can be done with Visual Studio 2005.
The following is a list of the vendors and their respective operating system levels for which the benchmark workloads have been pre-compiled and included with the benchmark distribution.
NFS workload:
IBM Corporation
AIX 5.3 TL05
FreeBSD
FreeBSD 5.4
Sun Microsystems, Inc.
Solaris10
Redhat Inc.
RHEL3 and RHEL4
Apple Computer Corporation
Mac OSX (Tiger,
and Leopard)
Microsoft Corporation
Windows
XP, and
CIFS workload:
FreeBSD
FreeBSD 5.4
Sun Microsystems, Inc.
Solaris10
Redhat Inc.
RHEL3 and RHEL4
Apple Computer Corporation
Mac OSX (Tiger,
and Leopard)
Microsoft Corporation
Windows
XP, and
4.3
Using the SFS Manager
This section briefly describes the usage of the Java-based Manager provided with the SPEC System File Server (SFS) SPECsfs2008 suite. The manager is used to run the benchmark. The results obtained from multiple data points within a run are also collected in a form amenable for ease of use with other result formatting tools.
This section does not cover the complete Client-Server environment setup in detail. It touches only the portions currently handled by the manager. For information on how to set up and run the SFS suite the reader is advised to refer to the section on configuring the SFS environment above.
A new Java-based manager program exists to handle the execution of the SPECsfs2008 benchmark. The manager replaces the shell scripts that had been used by previous versions of the benchmark. The new manager was implemented to allow the same manager to run on Windows and UNIX clients and to eliminate the need for using rsh, and rcp. The manager uses Remote Method Invocation (RMI) to communicate between the clients. Java requires a security policy to be defined when using RMI. The manager comes with a default security policy in the manager/java.policy file that allows anybody to send messages to any SPECsfs2008 client and to execute commands on the SPECsfs2008 client. If you wish to tighten up the security then you can edit the policy file. You can get more information on how to do this by looking up Java security documentation in the Java Runtime Environment that you are using.
4.3.1
Example of SUT Validation
C:\Documents and Settings\Administrator\Desktop\spec\manager>java SfsManager -r
sfs_rc -s junk -v 2
@(#)COPYRIGHT 2008 06/01/12
Copyright (c) 1992-2008 Standard Performance Evaluation Corporation
All rights reserved.
Standard Performance Evaluation Corporation (SPEC)
6585
Merchant Place, Suite 100
Warrenton, VA 20187
SPEC System File Server 2008 Release
This product contains benchmarks acquired from several sources who
understand and agree with SPEC's goal of creating fair and objective
benchmarks to measure computer performance.
This copyright notice is placed here only to protect SPEC in the
event the source is misused in any manner that is contrary to the
spirit, the goals and the intent of SPEC.
The source code is provided to the user or company under the license
agreement for the SPEC Benchmark Suite for this product.
This product includes cryptographic software written by
Eric Young (eay@cryptsoft.com)
Operating System Architecture: x86
Operating System Name: Windows 2003
>> Prior to running SFS for valid publication data, all targeted
>> file systems on the server are required to be cleaned (ex. newfs).
>>>>> STARTED SFS
VALIDATION ON Sat Jan 20
Executing SFS protocol Validation ...
Starting SFS protocol validation on client (c1)
sfsCIFS -V 2 -o CIFSpass -u Administrator –G MYGROUP -Q \\sut\export
SFS protocol validation completed successfully.
See ../result/sfsval.junk for results.
4.3.2
Example of a Benchmark Run
C:\Documents and Settings\Administrator\Desktop\spec\manager>java SfsManager -r
sfs_rc -s junk
@(#)COPYRIGHT 2008 08/01/12
Copyright (c) 1992-2008 Standard Performance Evaluation Corporation
All rights reserved.
Standard Performance Evaluation Corporation (SPEC)
6585
Merchant Place, Suite 100
Warrenton, VA 20187
SPEC System File Server 2008 Release
This product contains benchmarks acquired from several sources who
understand and agree with SPEC's goal of creating fair and objective
benchmarks to measure computer performance.
This copyright notice is placed here only to protect SPEC in the
event the source is misused in any manner that is contrary to the
spirit, the goals and the intent of SPEC.
The source code is provided to the user or company under the license
agreement for the SPEC Benchmark Suite for this product.
This product includes cryptographic software written by
Eric Young (eay@cryptsoft.com)
Operating System Architecture: x86
Operating System Name: Windows 2003
>> Prior to running SFS for valid publication data, all targeted
>> file systems on the server are required to be cleaned (ex. newfs).
The Results from this run will be stored in
../result/sfssum.junk
>>>>> STARTED SFS RUNS
ON Sat Jan 20
Sat Jan 20
Executing run 1 of 10 ... done
Sat Jan 20
Executing run 2 of 10 ... done
Sat Jan 20
Executing run 3 of 10 ... done
Sat Jan 20
Executing run 4 of 10 ... done
Sat Jan 20
Executing run 5 of 10 ... done
Sat Jan 20
Executing run 6 of 10 ... done
Sat Jan 20
Executing run 7 of 10 ... done
Sat Jan 20
Executing run 8 of 10 ... done
Sat Jan 20
Executing run 9 of 10 ... done
Sat Jan 20
Executing run 10 of 10 ... done
Reminder: The benchmark “run” may take many hours to complete depending upon how many data points were requested. Also, some failures may take more than an hour to manifest.
Note:
If one is running SPECsfs2008 on a Windows Workstation client. (non-server
version of Windows) then one must disable the Windows file server component before using the client
to run the SPECsfs2008 benchmark. This is accomplished by using a command
window and running:
net stop server
This
applies to all non-server versions of Windows. ( NT, XP, Win2k, and
4.4
Interpreting the Benchmark Results
Here
is sample output from an sfssum file for a full SFS run:
320 321
1.5 96187 299 CIFS T 4
37764720 4 10 2 2
2008
640 640
1.8 192114 300 CIFS T 4
75529440 4 10 2 2
2008
960 962
2.1 288236 299 CIFS T 4
117478440 4 10 2 2
2008
1280 1283
2.3 384644 299 CIFS T 4
155221920 4 10 2 2
2008
1600 1605
2.5 480411 299 CIFS T 4
192986640 4 10 2 2
2008
1920 1924
3.1 576595 299 CIFS T 4
234935648 4 10 2 2
2008
2240 2241
4.0 672385 300 CIFS T 4
272679104 4 10 2 2
2008
2560 2571
5.8 768874 299 CIFS T 4
314628128 4 10 2 2
2008
2880 2894
8.9 865936 299 CIFS T 4
352392832 4 10 2 2
2008
3200 3011 11.3
901761 299 CIFS T 4 390136320
4 10 2 2 2008
The column definitions are as follows:
- Aggregate requested load (ops/sec)
- Achieved SFS throughput (ops/sec). Note that the throughput achieved by the server may not necessarily match the requested load
- Average response time per SFS operation (msec/op)
- Total logical SFS operations completed
- Test time. Duration of the run at the requested load. Note that the actual duration may be off by a second relative to the requested run time, e.g., 300 secs in this case. This is OK
- File server protocol. Either CIFS or NFS3
- Network protocol. This will always be “T”, for TCP
- IP version. Should always be “4” since IPv6 is not supported at this time
- Total file set size created (KB)
- Number of load generators
- Number processes per load generator
- Maximum number of outstanding reads (BIOD_MAX_READS). This only applies to NFS testing, but the value shows up in CIFS sfssum files as well
- Maximum number of outstanding reads (BIOD_MAX_WRITES). This only applies to NFS testing, but the value shows up in CIFS sfssum files as well
- SFS version. Should be “2008” for SPECsfs2008
Below is sample output for one load point from an sfslog file. The columns in the table are self-explanatory. The table contains useful information which can tell you, for instance, which types of operations are most costly in terms of processing time on your server:
SFS Aggregate Results for 4
Client(s), Tue Jan 22
CIFS Protocol
---------------------------------------------------------------------------------------------------------
CIFS Target Actual CIFS
Op CIFS Op CIFS Mean
Std Dev Std Error Pcnt
Op CIFS CIFS
Logical Physical Op Response Response of Mean, of
Type Mix Mix
Success Success Error Time
Time 95% Conf Total
Pcnt Pcnt
Count Count Count
Msec/Op Msec/Op +-Msec/Op Time
---------------------------------------------------------------------------------------------------------
ECHO 0.5% 0.5%
4482 4482 0
0.62 0.98 0.03
0.0%
LOCKING_ANDX 1.1% 1.1%
9811 9811 0
0.93 2.12 0.03
0.1%
NT_TRANSACT_QUERY_SECURITY_DES 1.6%
1.6% 14435 14435
0 1.34 1.54
0.02 0.2%
READ_ANDX 20.5% 20.5%
184659 199307 0
39.71 74.05 0.04 72.2%
TRANS2_QUERY_FS_INFORMATION 1.6%
1.6% 14309 14309
0 2.77 2.68
0.03 0.4%
TRANS2_QUERY_FILE_INFORMATION 12.9%
12.9% 115989 115989
0 0.63 0.99
0.01 0.7%
TRANS2_QUERY_PATH_INFORMATION 21.5%
21.4% 193547 193547
0 0.65 1.20
0.00 1.2%
TRANS2_SET_FILE_INFORMATION 3.2%
3.2% 29140 29140
0 0.64 1.84
0.02 0.2%
TRANS2_FIND_FIRST2 8.6% 8.6% 77822
77822 0 0.74
2.20 0.01 0.6%
WRITE_ANDX 8.6% 8.6%
77679 83248 0
14.13 42.83 0.05 10.8%
NT_CREATE_ANDX 9.7% 9.7%
87712 87712 0
14.98 50.84 0.05 12.9%
CLOSE 9.7% 9.7%
87713 87713 0
0.73 1.15 0.01
0.6%
FLUSH 0.5% 0.5%
4463 4463 0
0.59 0.92 0.03
0.0%
---------------------------------------------------------------------------------------------------------
---------------------------------------------
|
SPEC SFS 2008 AGGREGATE RESULTS SUMMARY
|
---------------------------------------------
SFS CIFS THROUGHPUT: 3011 Ops/Sec AVG. RESPONSE TIME: 11.3 Msec/Op
TCP PROTOCOL (IPv4)
CIFS MIXFILE: [ SFS default ]
AGGREGATE REQUESTED LOAD: 3200
Ops/Sec
TOTAL LOGICAL CIFS OPERATIONS: 901761
TEST TIME: 299 Sec
TOTAL PHYSICAL CIFS OPERATIONS:
921978
PHYSICAL CIFS IO THROUGHPUT: 3083
Ops/sec
NUMBER OF SFS CLIENTS: 4
TOTAL FILE SET SIZE CREATED:
380992.5 MB
TOTAL FILE SET SIZE ACCESSED:
114310.2 - 116088.6 MB (100.00% to
101.56% of Base)
------------------------------------------------------------------------
5
Submission and Review Process
The SPECsfs2008 benchmark release includes tools for generating benchmark results in a format that can be submitted by email to the SFS results processing facility at SPEC, which will automatically process these results and distribute them to the SFS subcommittee for review. This section describes how you can use these tools to generate a file for each result that you wish to submit to SPEC. It also describes the review process that occurs once the results are submitted. At this point, it is expected that you have become familiar with the SPECsfs2008 Run and Reporting Rules.
5.1
Creating Reports
Once a benchmark run is completed, the configuration file, results file and additional information are combined into a submission file that is used for submitting runs to SPEC for review using the subedit command. Descriptions of the fields that need to be filled out in the submission file are included in Appendix A in the SPECsfs2008 Run and Reporting Rules. This same submission file can be use to generate reports in the form presented on the SPEC web site using the specreport command. Each command is documented below.
Running the SPEC SFS submit tools requires that the Java RunTime Environment (jre) release 1.5 or later be loaded on the system. You can get jre packages from www.java.com. The following examples assume
that the correct java program is in the current users path.
There are two components to the submit tools:
* subedit - Create an XML submission file to be used to generate a
report, optionally bundle all submit files into a ZIP
for submission.
* specreport - Create the HTML and/or text reports from the
submission files.
5.1.1
Creating the Submission File
To run subedit:
cd $SPEC/submit_tools
perl subedit.pl -o submitFile [-i sourceFile] resultFile
NAME
subedit.pl - SPEC SFS submission file editor
SYNOPSIS
subedit.pl -o submitFile [-i defaultsFile] resultFile rcFile
subedit.pl -b -o submitFile -i defaultsFile resultFile rcFile
subedit.pl -z -o submitZipFile -i defaultsFile resultFile rcFile
subedit.pl -v -i submitFile
subedit.pl -n -o
nonCompliantSubmitFile -i submitFile
DESCRIPTION
Produces an XML-based submission file by allowing you to
interactively walk through the "tree" of the file, prompting
for
field values. Two input files are required: resultFile (the file
created by a benchmark run whose name begins with 'sfssum_') and
rcFile (the benchmark configuration file). You can optionally
supply a previously generated submission file to provide default
field values. Note that the resultFile and rcFile are not required
for validation (-v) or non-compliant (-n) mode.
OPTIONS
-o submitFile - Names the output file.
-b (batch) - Instead of prompting for input, merges the
information from the three
files into the output.
This is equivalent to coming
up in interactive mode
and taking all defaults. If
-b is specified, then a
file containing default
values must be specified via
-i.
-z (zip) - Like batch mode, but produces a zip file for submission
with all necessary files in the
zip file specified with
-o
-v (validate) - Only validates the contents of the XML submission
file specified with -i,
reporting missing or
invalid nodes.
-n (non-compliant) - Marks the XML submission file specified with -i
as non-compliant and
stores the XML submission
marked as
non-compliant in the XML file
specified with -o
-i defaultsFile - The name of a previously generated output file
that is used as a
template for the editing session.
resultFile - The result file from the SPEC SFS run associated
with this submission. The
name of the file generated
by SPEC SFS begins with
"sfssum".
rcFile - The configuration file for the SPEC SFS run associated
with this submission.
Subedit Editor Interface
The
prompt displays the current location in the XML document (as if
it
were a tree with nodes separated by '.'), the current value
stored in the node at the current location (if any), and is
terminated with a ':'.
There are three types of actions that can be performed in the
subedit interface: commands, queries, and data entry.
Subedit Navigation Commands:
*
.u# - Go up # levels in the tree. If # is omitted, 1 is assumed.
*
.d - Go to the first child of the
current node, or the next
logical node in the document if the current node has no
children (as determined by
breadth first search). This is
the same as pressing 'enter' at a blank prompt.
*
.n - Go to the next sibling of the
current node, if one exists.
*
.p - Go to the previous sibling of the
current node, if one
exists.
*
.# - Go to the #th child of this node
(note: get a numbered list
of children with ?c).
Subedit List Manipulation Commands:
*
.a - Add a new, blank, list item to the
end of the list. This
command only works from the node which contains all the
list items.
*
.r# - Remove child node # from a list (for list use ?c). This
command only works from the node which contains all the
list items. Does not allow removal of the last node from a
list if there is only one item in the list.
Subedit Logical Commands:
*
.q - Quit the program. You will be
prompted for confirmation if
the document is invalid or has not been saved.
*
.s - Save the document - can also be
used to bundle all
submission materials into a ZIP file. See note below.
*
.v - Validate the document. This will
indicate whether document
is valid or not, and will prompt whether or not to display a
list of invalid nodes. The list of invalid nodes is simply a
list of paths from root to invalid nodes separated by line
returns,
e.g. 'specSFS4_0Info.productInfo.productAndVendor.vendor'
Subedit Queries:
*
?c - Show children of the current node. Produces a numbered
list, which is helpful for use with .# command. Nodes that
are invalid, or have invalid descendents, are prefixed by
'*'. Items in lists have a few fields summarized in the list
to help more easily identify the contents of the list items.
*
?d - Show documentation for the current node. This describes
what information should be put into the current node and
what constitutes a valid entry for the field, if there are
any restrictions.
*
? - Generic help: lists subedit commands
and queries.
Subedit Data Entry:
*
Entering text that is neither a command, nor query, and pressing
'enter' will cause that text to be stored in the current node,
replacing existing data and move to the next node.
*
Simply pressing 'enter' will keep the current data in the node
and move to the next node, as if '.d' was entered.
*
Entering a '.' then pressing 'enter' will enter multiline input
mode, where input will be continually accepted until a line with
a single '.' is encountered. This replaces existing data in the
node and moves to the next node.
Subedit Interface Notes:
*
Save a ZIP file containing all files for this submission:
.s file.zip
*
Save a snapshot of the document currently being edited to
another XML file:
.s file.xml
5.1.2
Creating the Submission Reports
To run specreport, enter the following:
cd $SPEC/submit_tools
perl specreport.pl -o reportFile submitFile
NAME
specreport.pl - SPEC SFS report generator
SYNOPSIS
specreport.pl [-h] [-r] [-f {html|text|summary}] -o reportFile
submitFile
DESCRIPTION
Translates an XML submission file into a human-readable report in
either HTML or text format.
OPTIONS
-h - Print usage information and terminate
-r - Generate a report for SPEC reviewers. -f summary causes this to be
ignored
-f - Generate either an HTML (default), text, or a summary of key,value
pairs
-o reportFile - Filename for the report to be generated
submitFile - Path and filename of XML submission file from which
to generate the report
5.1.3
Submit Tools Example Files
* sfssum.example - a sample benchmark NFS run
sfssum output file
* sfssum.cifs.example - a sample benchmark
CIFS run sfssum output file
* example_rc - sample NFS configuration file
to correspond with
sfssum.example
* example_cifs_rc - sample CIFS configuration
file to correspond with
sfssum.cifs.example
* example.xml - a sample NFS submission file
containing default
values but no results -
subedit must be used to add
result information before this
is a valid submission
file
* example.cifs.xml - a sample CIFS submission
file containing
default values but no
results - subedit must be
used to add result
information before this is a
valid submission file
* example.txt - a sample text NFS submission report created
by
specreport
* example.cifs.txt - a sample text CIFS
submission report created by
specreport
* example_review.txt - a sample text NFS
submission report created by
specreport for SPEC
reviewers.
* example.html - a sample HTML NFS submission
report created by
specreport
* example.cifs.html - a sample HTML CIFS
submission report created by
specreport
* example_review.html - a sample HTML NFS
submission report created by
specreport for
reviewers at SPEC.
* example.png - the results chart created by
specreport for the HTML
NFS submission report example
* example.cifs.png - the results chart
created by specreport for the
HTML CIFS submission
report example
* example_review.png - the results chart
created by specreport for
the HTML NFS
submission report example for
the SPEC reviewers.
* example_config.jpg - the config diagram
referenced by the
example.xml file and the sample HTML
submission reports
5.1.4
Submit Tools Example Scenarios
5.1.4.1
Scenario 1:
An XML submission file with configuration
details already exists and you
want to generate a submission file for an
SFS2008 run without editing
any of the information contained within.
Scenario 1 Prerequisites:
* The
RC file used for the SFS2008 run (referred to as example_rc)
* The
sfssum file generated by the SFS2008 run (referred to as
sfssum.example)
* The
XML submission file containing configuration details for the
SFS2008 run (referred to as example.xml)
* Any
JPEG configuration diagrams referenced by the XML submission file
containing configuration details (example.xml) (for this example,
it
is assumed there is one named example_config.jpg)
5.1.4.1.1
Scenario 1, Example 1:
Generate XML submission file (sub.xml) only
*
Step 1: Move all files mentioned in prerequisites section to the
submit_tools directory.
*
Step 2: From the submit_tools directory, run the command:
perl subedit.pl -b -o sub.xml -i example.xml \
sfssum.example example_rc
*
Step 3: subedit should produce the following output:
Document is valid
Saved sub.xml
*
Step 4: Verify that the file sub.xml was created in the
submit_tools directory.
5.1.4.1.2
Scenario 1, Example 2:
Generate a ZIP file (sub.zip) of all
submission-related materials for
submission to SPEC
*
Step 1: Move all files mentioned in prerequisites section to the
submit_tools directory.
*
Step 2: From the submit_tools directory, run the command:
perl subedit.pl -z -o sub.zip -i example.xml \
sfssum.example example_rc
*
Step 3: subedit should produce the following output:
Document is valid
Saved sub.zip
*
Step 4: Verify that the file sub.zip was created in the
submit_tools directory.
5.1.4.2
Scenario 2:
You want to generate an XML submission file,
or ZIP submission file
for submission to SPEC, for an SFS2008 run
and do not have an existing
XML submission file with configuration
details for the run.
Scenario 2 Prerequisites:
* The
RC file used for the SFS2008 run (referred to as example_rc)
* The
sfssum file generated by the SFS2008 run (referred to as
sfssum.example)
* Any
JPEG configuration diagrams to be included in the submission
Scenario 2, Example 1:
Generate the XML submission file (sub.xml)
only
*
Step 1: Move all files mentioned in the prerequisites section to
the submit_tools directory.
*
Step 2: From the submit_tools directory, run the command:
perl subedit.pl -o sub.xml sfssum.example example_rc
*
Step 3: subedit will enter into interactive editing mode and
display the following prompt:
.specSFS4_0Info
:
The first line of the prompt indicates your position within
the XML 'tree' of the submission file, with each node
separated by a period (.). The second line of the prompt,
which begins with a colon (:), is where you enter subedit
commands to edit, browse, and enter information into the
document.
*
Step 4: Using the subedit commands (see "Subedit Editor Interface"
above), step through the document and fill in all relevant
information. There are a couple helpful "query" commands
that provide information to help you fill in information
correctly and know your position in the document. For
general help, enter a ? and press the "enter" key.
For example, ?c will list all immediate children of the
node you are currently at in the document. From the prompt
in step 3, type the following, and then press the enter
key:
?c
*
Step 5: Subedit should output the following:
1. *productInfo
2. *testInfo
3. results
4. otherReportNotes
5. resultCompliance
6. *submissionInfo
:
If the child node name is preceded by "*" it means either
it or one of its descendents is either empty or contains
invalid data.
*
Step 6: To get started filling in the report, fill in the vendor
name field by pressing the "enter" key at the prompt in
step 5 three times until the prompt looks like:
.specSFS4_0Info.productInfo.vendorAndProduct.vendor
:
*
Step 7: To get a description of what to fill in for this field,
enter the following command and press the "enter" key:
?d
*
Step 8: Subedit should output the following:
The name of the SPEC licensee who is publishing this report.
----------
Type: String
Value must not be empty, and cannot be multi-line
----------
:
*
Step 9: Now, to fill in a value for the field, simply type in the
desired vendor name at the prompt and press "enter".
*
Step 10: Subedit should output the following:
.specSFS4_0Info.productInfo.vendorAndProduct.productName
:
This indicates that subedit has saved the value you
entered for the vendor field and has automatically
advanced to the next field, "productName"
*
Step 11: Continue filling in information until complete
*
Step 12: To save the XML file, enter the following command and press
the "enter" key:
.s
*
Step 13: Subedit should display the following:
Saved sub.xml
You should then be returned to the subedit prompt, and may
quit by entering the following command and pressing the
"enter" key:
.q
If you see the following prompt:
This document is not valid! Really save (y/n)?
Then there are still empty fields in the document. You
must fill in all fields as necessary so that the document
is valid before submitting your result to SPEC.
5.1.4.2.1
Scenario 2, Example 2:
Generate the ZIP (sub.zip) file of all
submission materials for
submission to SPEC.
NOTE: For a more detailed walkthrough of
editing the document, see
Scenario 2, Example 1 above.
*
Step 1: Move all files mentioned in the prerequisites section to
the submit_tools directory.
*
Step 2: From the submit_tools directory, run the command:
perl subedit.pl -o sub.xml sfssum.example example_rc
NOTE: Using this procedure, sub.xml will not be generated,
though it can be easily generated by issuing a ".s" command
without any arguments. (See Step 5)
*
Step 3: subedit will enter into interactive editing mode and
display the following prompt:
.specSFS4_0Info
:
*
Step 4: Using the subedit commands (see "Subedit Editor Interface"
above), step through the document and fill in all relevant
information until complete.
*
Step 5: To save the ZIP file, enter the following command and press
the "enter" key:
.s sub.zip
*
Step 6: Subedit should display the following:
Saved sub.zip
You should then be returned to the subedit prompt, and may
quit by entering the following command and pressing the
"enter" key:
.q
If you see the following prompt:
This document is not valid! Really save (y/n)?
Then there are still empty fields in the document. You must
fill in all fields as necessary so that the document is
valid before submitting your result to SPEC.
5.1.4.3
Scenario 3:
You want to generate an XML submission file,
or ZIP submission file
for submission to SPEC, for an SFS2008 run
and have an existing XML
submission file with configuration details
for the run that you wish
to edit.
Scenario 3 Prerequisites:
* The
RC file used for the SFS2008 run (referred to as example_rc)
* The
sfssum file generated by the SFS2008 run (referred to as
sfssum.example)
* The
XML submission file containing configuration details for the
run
that you wish to edit (referred to as example.xml)
* Any
JPEG configuration diagrams to be included in the submission
5.1.4.3.1
Scenario 3, Example 1:
Generate the XML submission file (sub.xml)
only
*
Step 1: Move all files mentioned in the prerequisites section to
the submit_tools directory.
*
Step 2: From the submit_tools directory, run the command:
perl subedit.pl -i example.xml -o sub.xml \
sfssum.example example_rc
*
Step 3: subedit will enter into interactive editing mode and
display the following prompt:
.specSFS4_0Info
:
The first line of the prompt indicates your position within
the XML 'tree' of the submission file, with each node
separated by a period (.). The second line of the prompt,
which begins with a colon (:), is where you enter subedit
commands to edit, browse, and enter information into the
document.
*
Step 4: Using the subedit commands (see "Subedit Editor Interface"
above), step through the document and fill in all relevant
information. There are a couple helpful "query" commands
that provide information to help you fill in information
correctly and know your position in the document. For
general help, enter a ? and press the "enter" key.
For example, ?c will list all immediate children of the
node you are currently at in the document. From the prompt
in step 3, type the following, and then press the enter
key:
?c
*
Step 5: Subedit should output the following:
1. *productInfo
2. testInfo
3. results
4. otherReportNotes
5. resultCompliance
6. submissionInfo
:
If the child node name is preceded by "*" it means either
it or one of its descendents is either empty or contains
invalid data.
*
Step 6: To get started filling in the report, fill in the vendor
name field by pressing the "enter" key at the prompt in
step 5 three times until the prompt looks like:
.specSFS4_0Info.productInfo.vendorAndProduct.vendor
Acme Servers
:
Note that the prompt now displays the current value of the
node on a separate line, indented, before the ":"
prompt. (Your existing value may not be "Acme Servers".)
This line will be omitted if the node does not contain a value.
*
Step 7: To get a description of what to fill in for this field,
enter the following command and press the "enter" key:
?d
*
Step 8: Subedit should output the following:
The name of the SPEC licensee who is publishing this report.
----------
Type: String
Value must not be empty, and cannot be multi-line
----------
:
*
Step 9: Now, to fill in a value for the field, simply type in the
desired vendor name at the
prompt and press "enter".
*
Step 10: Subedit should output the following:
.specSFS4_0Info.productInfo.vendorAndProduct.productName
:
This indicates that subedit has saved the value you
entered for the vendor field and has
automatically
advanced to the next field, "productName", which contains
no value yet.
*
Step 11: Continue filling in information until complete
*
Step 12: To save the XML file, enter the following command and press
the "enter" key:
.s
*
Step 13: Subedit should display the following:
Saved sub.xml
You should then be returned to the subedit prompt, and may
quit by entering the following command and pressing the
"enter" key:
.q
If you see the following prompt:
This document is not valid! Really save (y/n)?
Then there are still empty fields in the document. You
must fill in all fields as necessary so
that the document
is valid before submitting your result to SPEC.
5.1.4.3.2
Scenario 3, Example 2:
Generate the ZIP (sub.zip) file of all
submission materials for
submission to SPEC.
NOTE: For a more detailed walkthrough of
editing the document, see
Scenario 3, Example 1 above.
*
Step 1: Move all files mentioned in the prerequisites section to
the submit_tools directory.
*
Step 2: From the submit_tools directory, run the command:
perl subedit.pl -i example.xml -o sub.xml \
sfssum.example example_rc
NOTE: Using this procedure, sub.xml will not be generated,
though it can be easily generated by issuing a ".s" command
without any arguments. (See Step 5)
*
Step 3: subedit will enter into interactive editing mode and
display the following prompt:
.specSFS4_0Info
:
*
Step 4: Using the subedit commands (see "Subedit Editor Interface"
above), step through the document and fill in all relevant
information until complete.
*
Step 5: To save the ZIP file, enter the following command and press
the "enter" key:
.s sub.zip
*
Step 6: Subedit should display the following:
Saved sub.zip
You should then be returned to the subedit prompt, and may
quit by entering the following command and pressing the
"enter" key:
.q
If you see the following prompt:
This document is not valid! Really save
(y/n)?
Then there are still empty fields in the document. You must
fill in all fields as necessary so that the document is
valid before submitting your result to SPEC.
5.1.4.4
Scenario 4:
You want to generate a text or HTML report,
as would appear on the
SPEC website, for your SFS2008 result.
Scenario 4 Prerequisites:
* The
XML submission file for your run, as generated by subedit
(referred to as example.xml). (See Scenarios 1, 2, and 3.)
* Any
JPEG configuration diagrams to be included in the submission
that are referenced in your XML submission file.
5.1.4.4.1
Scenario 4, Example 1:
Generate the HTML report (example.html).
*
Step 1: Move all files mentioned in the prerequisites section to
the submit_tools directory.
*
Step 2: From the submit_tools directory, run the command:
perl specreport.pl -f html -o example.html example.xml
*
Step 3: Specreport should output the following:
Creating example.html
*
Step 4: Verify that example.html and example.png (the chart of the
SFS2008 results) were created in the submit_tools
directory.
*
Step 5: The example.html file may be opened in a browser and
viewed.
5.1.4.4.2
Scenario 4, Example 2:
Generate the text report (example.txt).
*
Step 1: Move all files mentioned in the prerequisites section to
the submit_tools directory.
NOTE: The config diagrams are only necessary when
generating HTML reports
*
Step 2: From the submit_tools directory, run the command:
perl specreport.pl -f text -o example.txt example.xml
*
Step 3: Specreport should output the following:
Creating example.txt
*
Step 4: Verify that example.txt was created in the submit_tools
directory.
*
Step 5: The example.txt file may now be opened in a text editor and
viewed.
5.1.5
Translation of Free-Form Fields
A number of the full disclosure fields described above say that their content contains “free-form” information. When providing that information (typically with the subedit command) you are allowed to supply fragements of source that conform to a subset of the HTML language. The specreport command inserts this text literally into the appropriate place when generating an HTML output. When the -t (text output) option is supplied, the HTML-fragment is interpreted in the following manner:
|
HTML Tag |
Meaning |
|
<p> |
Paragraph break – insert a blank line and start the remaining text at the current indent level. |
|
<br> |
Line break – start a new line. |
|
<blockquote> .. </blockquote> |
Increase the indent level by four spaces until the corresponding end tag is encountered. |
|
<ul> .. </ul> |
Unordered list – start a new line and indent four spaces until the </ul> is encountered. Lists can be nested. |
|
<li> |
Start a new list item by un-indenting two spaces and inserting “* ” or some other character if at a nested level greater than one. |
|
<pre> .. </pre> |
Copy contained text preserving line breaks. |
|
all other tags |
Are ignored, but removed. Thus, for example, some text can be in a particular font in the HTML rendering, but the font change will have no effect in the text rendering. |
All tag attributes are ignored. All tags not in the above table are removed (and ignored).
Additionally the text processor converts the following text sequences:
|
Input |
Translation |
|
< |
< |
|
> |
> |
|
" |
″ |
|
& |
& |
For example, the following supplied in a bomItem description that produces some underlined bold text in the html version and preserves the text while ignoring the other font directives:
Disk drive that contains
<b><u>many</u></b> interesting features including the
fact that it holds bits of information.
Might be rendered in HTML as:
Configuration
Bill of Materials
|
No |
Qty |
Vendor |
Model/Name |
Description |
|
… |
||||
|
… |
… |
… |
… |
Disk drive that contains many interesting features including the fact that they hold bits of information. |
|
… |
||||
and in text as:
Configuration Bill of Materials
No Qty Vendor Model/
Description
Name
…
… … …
… Disk drive that contains
many
interesting features including
the fact that they hold bits of
information.
…
Note that the submitter is responsible for a reasonable presentation in both the HTML format and the text format of the report. It is suggested that if you take advantage of this feature that you use the specreport command to generate the report in both forms and inspect the generated reports.
5.2
Submitting Results
Once you have generated a submission file as described in the Creating Reports section above, you may submit your run for review by the SFS committee by emailing the ZIP file to subsfs2008@spec.org. Upon receipt, the SPEC results processing facility will parse the submission file and validate the formats. If the check passes, an email reply is returned to the sender including a submission number assigned to the result. This submission number is used to track the result during the review and publishing process. If there are any formatting errors, the parser will respond with a failure message indicating where in the file the parsing failed. You may then either correct the error and resubmit or contact the SPEC office for further assistance.
Every results submission goes through a minimum two-week review process, starting on a scheduled SPEC SFS sub-committee conference call. During the review, members of the committee may contact the submitter and request additional information or clarification of the submission. Once the result has been reviewed and accepted by the committee, it is displayed on the SPEC web site at http://www.spec.org/.
6
FAQ
6.1
SPECsfs2008 Benchmark Press Release
Question 1: What is SPECsfs2008 and how does this benchmark compare to other network file system (NFS/CIFS) benchmarks?
Answer :
SPECsfs2008
is the latest version of the Standard Performance Evaluation Corp.'s benchmark
that measures CIFS and NFS file server throughput and response time. It differs
from other file server benchmarks in that it provides a standardized method for
comparing performance across different vendor platforms. The benchmark was
written to be client-independent and vendor-neutral. Results are validated
through peer review before publication on SPEC's public Web site <http:// www.spec.org/sfs2008/>
Question 2: Does this benchmark replace the SPEC SFS 3.0 suite?
Answer :
Yes. Now that SPECsfs2008
is available, SFS 3.0 licenses are no longer being sold. Results from SFS 3.0
will no longer be accepted by SPEC for publication.
Question 3: Can SPECsfs2008 results be compared to SFS 3.0 results?
Answer :
No. Although the benchmarks
are similar in many ways, they cannot be compared, since SPECsfs2008 uses a
different file selection algorithm, its results can only be compared with other
SPECsfs2008 results.
Question 4: What improvements have been made to SPECsfs2008?
Answer : In addition to general code improvements, SPECsfs2008 includes major enhancements:
1. A workload to test servers accessible via the CIFS protocol.
2. Support for Windows and Mac OSX clients.
3. Enhancements to the NFS workload.
4. Removal of dependency on UNIX specific commands, such as rsh and rcp.
5. A more flexible reporting form which allows for a wider array of modern system configurations to be accurately detailed.
Question 5: How was the SPECsfs2008 workload determined?
Answer :
The SPECsfs2008 NFS and CIFS
workloads are based primarily on data collected from tens of thousands of
fileservers from member companies, deployed by customers in a variety of
file-serving application environments. The bulk of the data was collected by
mining databases that hold the data received via automatic reporting systems
embedded in products from member companies. To provide further information,
NFS/CIFS packet trace data was collected from a number of customer and member
company internal systems. The resulting workload in SPECsfs2008 more accurately
represents a composite of the workloads seen in current fileserving
environments.
Question 6: What is the metric for SPECsfs2008?
Answer :
SPECsfs2008 has two
performance measurement metrics: SPECsfs2008_nfs for NFS, and SPECsfs2008_CIFS
for CIFS. Both metrics include a throughput measure (in operations per second)
and an overall response time measure (the average response time per operation).
Question 7: Are the metrics for SPECsfs2008 different than the metric for SFS 3.0?
Answer :
Yes. SPECsfs2008 maintains similar metrics that
were used in SFS 3.0, but it also now provides metrics for CIFS. It provides
overall response time and peak throughput. The larger the peak throughput the
better. The lower the overall response time the better. The overall response
time is an indicator of how quickly the system under test responds to NFS, or CIFS,
operations over the entire range of the tested load. In real-world situations,
servers are not run continuously at peak throughput, so peak response time
provides only minimal information. The overall response time is a measure of
how the system will respond under an average load. Mathematically, the value is
derived by calculating the area under the curve divided by the peak throughput.
Question 8: How widespread are NFS and CIFS?
Answer :
NFS has been shipping on
systems for more than sixteen years and is available for most systems. CIFS is
the dominant remote file system protocol for all Windows systems.
Question 9: What is the correlation between the TPC (Transaction Processing Council) and SPEC (Storage Performance Council) benchmarks, including SPECsfs2008?
Answer :
There is no correlation; the
benchmarks present very different workloads on the systems under test and
measure different aspects of system performance .
Question 10: Is SPECsfs2008 a CPU-intensive or I/O-intensive benchmark?
Answer :
SPECsfs2008 is a
system-level benchmark that heavily exercises CPU, mass storage and network
components. The greatest emphasis is on I/O, especially as it relates to
operating and file system software. To obtain the best performance for a system
running SPECsfs2008, the vendor will typically add additional hardware -- such
as memory, disk controllers, disks, network controllers and buffer cache – as
needed in order to help alleviate I/O bottlenecks and to ensure that server
CPUs are used fully.
Question 11: For what computing environment is SPECsfs2008 designed?
Answer :
The benchmark was developed
for load-generating clients running in the UNIX or Windows. But since the
load-generating clients execute the benchmark code, SPECsfs2008 can be used to
evaluate the performance of any CIFS and NFS file server, regardless of the
underlying environment.
Question 12: Can users measure NFS performance for workloads other than the one provided within SPECsfs2008?
Answer :
Yes, users can measure
their own workloads by making changes to the SPECsfs2008 benchmark mix
parameters to reflect the new measurements. The SPECsfs2008 User's Guide
details how this can be done. Workloads created by users cannot, however, be
compared with SPECsfs2008 results, nor can they be published in any form, as
specified within the SPECsfs2008 license.
Question 13: To what extent is the server's measured performance within SPECsfs2008 affected by the client's performance?
Answer :
SPEC has written SPECsfs2008
to minimize the effect of client performance on SPECsfs2008 results.
Question 14: How does SPEC validate numbers that it publishes?
Answer : Results published on the SPEC Web
site have been reviewed by SPEC members for compliance with the SPECsfs2008 run
and disclosure rules, but there is no monitoring beyond that compliance check.
The vendors that performed the tests and submitted the performance numbers have
sole responsibility for the results. SPEC is not responsible for any
measurement or publication errors.
Question 15: Are
the reported SPECsfs2008 configurations typical of systems sold by vendors?
Answer :
Yes and no. They are
similar to large server configurations, but the workload is heavier than that
found on smaller server configurations. SPEC has learned from experience that
today's heavy workload is tomorrow's light workload. For some vendors, the
configurations are typical of what they see in real customer environments,
particularly those incorporating high-end servers. For other vendors, SPECsfs2008
configurations might not be typical.
Question 16: Do the SPECsfs2008 run and disclosure rules allow results for a clustered server?
Answer :
Yes, cluster configurations
are allowed as long as they conform strictly to the even distribution of all
resources as defined by the SPECsfs2008 run and disclosure rules.
Question 17: Why do so few published results approach SPEC's response-time threshold cutoff of 20 milliseconds?
Answer :
It is important to
understand first that SPECsfs2008 run rules do not require that the throughput
curve be carried out to 20 ms; they only state that the results cannot be
reported for a response time higher than 20 ms. There are several reasons why
results do not approach the threshold cutoff. Optimally configured servers
often will achieve their maximum throughput at response times lower than the
cutoff. Additionally, some vendors emphasize maximum throughput while others
concentrate on fast response time. It does not indicate a problem with the
results if the curve is not carried out to 20 ms, and those reviewing results
should not try to predict what the throughput curve might be past the reported
point.
Question 18: Why was the response-time threshold reduced from 40 ms for SFS 3.0 to 20 ms for SPECsfs2008 ?
Answer :
The lower response-time
threshold reflects advances in server technologies since the release of SFS
3.0.
Question 19: What resources are needed to run the SPECsfs2008 benchmark?
Answer : In addition to a server, a test
bed includes several clients and an appropriate number of networks. Ideally,
the server should have enough memory, disks and network hardware to saturate
the CPU. The test bed requires at least one network. A minimum of 256 MB of
memory is required for each client, although in most cases 512 MB is
needed. To facilitate accuracy of
reported vendor results, SPECsfs2008 includes an entire NFS, and CIFS
implementation. Examples of typical load-generating configurations can be found
on the SPEC Web site: < http://www.spec.org/sfs2008/>.
Question 20: What is the estimated time needed to set up and run SPECsfs2008?
Answer : Hardware
setup and software installation time depend on the size of the server and the
complexity of the test beds. Many servers require large and complex test beds.
The SPECsfs2008 software installs relatively quickly. A SPECsfs2008 submission from
a vendor includes at least 10 data points, with each data point taking from 30
to 90 minutes to complete.
Question 21: What shared resources does SPECsfs2008 use that might limit performance?
Answer :
Shared resources that might
limit performance include CPU, memory, disk controllers, disks, network
controllers, network concentrators, network switches, clients, etc.
Question 22: SPEC's CPU2006 benchmark defines compiler optimization flags that can be used in testing. Does SPECsfs2008 set tuning parameters?
Answer :
When submitting results for
SPEC review, vendors are required to supply a description of all server tuning
parameters within the disclosure section of the reporting page.
Question 23: Can
a RAM disk be used within a SPECsfs2008 configuration?
Answer : SPEC enforces strict storage
rules for stability. Generally, RAM disks do not meet these rules, since they
often cannot survive cascading failure-recovery requirements unless an
uninterruptible power supply (UPS) with long survival times is used.
Question 24: How will the choice of networks affect SPECsfs2008 results?
Answer :
Different link types and
even different implementations of the same link type might affect the measured
performance -- for better or worse -- of a particular server. Consequently, the
results measured by clients in these situations might vary as well.
Question 25: Is SPECsfs2008 scalable with respect to CPU, cache, memory, disks, controllers and faster transport media?
Answer :
Yes, like SFS 3.0, the new
benchmark is scalable as users migrate to faster technologies.
Question 26: What is the price of a SPECsfs2008 license and when will it be available?
Answer : SPECsfs2008
is available now on CD-ROM for $1600.
Contact the SPEC
office:
Standard
Performance Evaluation Corporation (SPEC)
6585 Merchant Place, Suite
100
Warrenton, VA 20187, USA
Phone: 540-349-7878
Fax:
540-349-5992
E-Mail:
info@spec.org
Question 27: How much is an upgrade from SFS 3.0 to SPECsfs2008?
Answer
: The
SPECsfs2008 benchmark is a major new release.
The upgrade is $700 for those who purchased SFS 3.0 licenses within 90
days prior to the SPECsfs2008 release.
Any purchases after that will be at the full price. Upgrades are available through the SPEC
office.
Question 28: Can users get help in understanding how to run SPECsfs2008?
Answer : The majority of questions should be answered in the SPECsfs2008 User's Guide. There is also useful information on the SPEC Web site: < http://www.spec.org/sfs2008/>.
6.2
Running and troubleshooting the benchmark
Question 29: Do I need to measure NFS and CIFS?
Answer :
No. NFS and CIFS are
separate workloads and you only need to measure and disclose the ones you want.
Question 30: How do I get started running the SPECsfs2008 benchmark?
Answer : Please
read the SPECsfs2008 User's Guide in its entirety.
Question 31: I am running into problems setting up and running the benchmark. What can I do?
Answer :
The most common problem is
usually that file server file systems are not being correctly mounted on the
clients. Most
of the problems relating to the SPECsfs2008 benchmark can be resolved by
referring to appropriate sections of the User's Guide, including this FAQ.
Question 32: I have read the SPECsfs2008 User's Guide. But I am still running into problems. What can I do next?
Answer :
Looking at the sfslog.* and
sfscxxx.* files can give you an idea as to what may have gone wrong. In addition, you can check the Troubleshooting
SPECsfs2008 web page on the SPEC website.
And, as a last resort, you can contact SPEC at support@spec.org. It is assumed that such
calls/emails are from people who have read the SPECsfs2008 User's Guide
completely, and have met all the prerequisites for setting up and running the
benchmark.
Question 33: How does one abort a run?
Answer :
The benchmark can be
aborted by simply stopping the SfsManager.
This will kill all SFS related processes on all clients and on the prime
client. The processes are sfscifs, sfsnfs3, sfs_syncd and sfs_prime.
Question 34: For a valid run, which parameters are required to be unchanged?
Answer :
Information is provided in
the SFS2008 Run and Reporting Rules and in the sfs_nfs_rc, and sfs_cifs_rc
files, and this is enforced by the benchmark. If invalid parameter values are
selected, the benchmark reports an invalid run.
Question 35: Is there a quick way to debug a testbed?
Answer :
Read the SPECsfs2008 User's
Guide, ping the server from the client, try mounting the server file systems or
shares from the client using the client's real CIFS or NFS implementation, ping
from the prime client to the other clients and vice versa, run the benchmark with one client and one file system.
Question 36: When I specify 1000 NFS ops/sec in the sfs_nfs_rc, the results report only 996 NFS ops/sec requested, why is it less?
Answer : The sfs_nfs_rc file specifies the
total number of NFS ops/sec across all of the clients used. Because the
benchmark only allows specifying an even number of NFS ops/sec, the actual
requested ops/ sec may be less due to rounding down. For example, 1000 NFS
ops/sec requested over 6 clients will result in each client generating 166 NFS
ops/sec for an aggregate of 996 NFS ops/sec.
Question 37: The number of operations/second that I achieve is often slightly higher or slightly lower than the requested load. Is this a problem?
Answer : No, the benchmark generates operations using random selection and dynamic feedback to pace correctly. This will result in small difference from the actual requested load.
6.3
Tuning the Server
Question 38: What are a reasonable set of parameters for running the benchmark?
Answer :
Study existing results'
pages with configuration information similar to your system configuration.
Question 39: When I request loads of 1000, 1300, 1600 NFSops, I get 938, 1278, and 1298 NFSops, respectively. Why do I not get the requested load?
Answer :
This may happen when one
has reached the server limit for a particular configuration. One needs to
determine the bottleneck, and possibly tune and/or enhance the server
configuration.
Question 40: How do I increase the performance of our server?
Answer : One may need to add, as necessary, one or more of the following: processors, memory, disks, controllers, etc.
6.4
Submission of Results
Question 41: We have a valid set of results. How do we submit these results to SPEC?
Answer :
See the Submission and
Review Process section. The new submission tool documentation is in that
section.
7
Bibliography
• [Wittle]
• [Pawlowski]
• [RFC1014] Sun
Microsystems, Inc., “XDR: External Data Representation Standard”, RFC 1014, Sun
Microsystems, Inc., June 1987. Specification for canonical format for data
exchange, used with RPC.
• [RFC1057] Sun
Microsystems, Inc., “RPC: Remote Procedure Call Protocol Specification”, RFC
1057, Sun Microsystems, Inc., June 1988.
Remote procedure protocol specification.
• [RFC1094] Sun
Microsystems, Inc., “Network Filesystem Specification”, RFC 1094, Sun
Microsystems, Inc., March 1989. NFS
version 2 protocol specification.
• [RFC1813] Sun
Microsystems, Inc. “NFS Version 3 Protocol Specification”, RFC 1813, Sun
Microsystems, Inc., June 1995. NFS version 3 protocol specification
• [X/OpenNFS] X/Open
Company, Ltd., X/Open CAE Specification: Protocols for X/Open Internetworking:
XNFS, X/Open Company, Ltd., Apex Plaza, Forbury Road, Reading Berkshire, RG1
1AX, United Kingdom, 1991.
• [Robinson] David
Robinson, “The Advancement of NFS Benchmarking SFS 2.0”, LISA XIII, 1999,
Describe shortcomings in SFS 1.0 and a discussion of design and functionality
of SFS 2.0.
• [Capps] Hewlett-Packard,
• [Gold] Network Appliance, Stephen Gold,
“Defects in SFS 2.0”, SPEC website, 2001, An analysis of the defects in SFS 2.0
that lead to SFS 3.0
• [CIFS] Storage Networking Industry Association
(SNIA), SNIA CIFS Technical Work Group, “Common Internet File System (CIFS)
Technical Reference Version 1.0”, http://www.snia.org/tech_activities/CIFS/CIFS-TR-1p00_FINAL.pdf,
March 2002.
8
Trademarks
IBM and AIX are
trademarks of International Business Machines Corporation in the
Microsoft(R),
Windows, Windows NT(R), Visual Studio, and the Windows logo are
trademarks of Microsoft Corporation in the
Java, and all
Java-based trademarks and logos are trademarks of Sun Microsystems, Inc. in the
UNIX is a
registered trademark of The Open Group in the
Linux is a
trademark of Linus Torvalds in the
MacOS is a
trademark of Apple, Inc. in the
Other company, product, or service names may be
trademarks or service marks of others.
9
Appendix A – Building SFS Benchmark Components
9.1
Building SFS for UNIX
Note that it is a requirement that you have a GNU-compatible build environment (e.g., a ‘gmake’ compatible ‘make’) in order to build SFS on a UNIX system.
To build SFS, you need to simply:
· cd to the top-level spec directory ($SPEC)
· Type make
The executables and other necessary files are copied onto the $SPEC/bin directory as part of the build process. The root password may be required in order to set the setuid bit on the executables.
9.2
Building SFS for Windows
SPECsfs2008 for WIN32 was developed using Microsoft Visual Studio 2005. Other versions of the development environment may work for building the benchmarks, but these have not been tested.
9.2.1
Update Visual Studio Libraries/Includes
If not already installed, download and install the Microsoft Platform SDK for Windows XP SP2 update. Visit http://www.microsoft.com/msdownload/platformsdk/sdkupdate/ for information/download links. [NOTE: The SDK appears to have been recently updated and is now named Microsoft Windows Server 2003 SP1 Platform SDK. The above link should redirect to the correct page.] Only the core SDK needs to be installed (other SDK components may be installed as desired). Read the README file included, and make sure to register PSDK directories with Visual Studio.
This update includes some implementations for sockets that allow porting to use some of the already included functions and types in SFS.
9.2.2
Open the Visual Studio workspace files
Obtain the SPECsfs2008 source base and place it in a convenient location on the system to be used for building. In the benchspec\162.nfsv2\src directory of the sourcebase is a win32 folder. This contains all the project files and the WIN32 specific source files for building SFS for WIN32. Open the src\win32\SFS_WIN32\SFS_WIN32.dsw workspace file using Visual Studio. This workspace contains the project files for each of the executables plus the rpc and CIFS libraries.
9.2.3
Build the individual project files
If you are familiar with building projects in Visual Studio, you may build the projects as you are accustomed to doing and skip this section.
To build all the projects at once, from the Build menu select Batch Build. With all projects and configurations selected ,click Build or Rebuild All and the build process will begin. Debug versions will be built in bin\win32\Debug. Debug browse information files will be built in bin\win32\Browse. These are useful for finding references between source files (e.g. find where [variable] is declared or [function] is defined). Release versions will be built in bin\win32.
To build the individual projects, from the Project menu select a project under the Select Active Project submenu. The selected project will appear in bold in the workspace window. From the Build menu, select Rebuild All to force a rebuild of all modules in that project, or select Build [project name] to build only those modules that have changed or are missing.
Paths and directories within the project settings are all relative to the project file locations, so building the benchmark files should be possible regardless of where the sourcebase is placed on the system.
9.2.4
Debugging with Visual Studio
Visual Studio may be used to debug one or more of the SFS benchmark executables. For executing either the SFS client or prime client applications, the runtime parameters must be set. From the Project menu select Settings. For the application and build of interest, enter the command line parameters in the Program arguments box of the Debug tab.
9.3
Building the SFS Manager
You must load the J2SE™ Development Kit release 5.0 or later on the system where you want to build the Manager. Update the paths in the build script if needed and then build the java code by entering the following:
cd $SPEC
cd manager
build
Distribute the built java code to the ‘manager’ directory on all the clients.
Note that the manager uses the following algorithm for finding the executables to be used by the benchmark:
1) It uses the binary path argument specified on the command line.
2) If no binary path argument was specified then it looks in the bin directory.
3) If the executables where not found in the bin directory then it will look in the binaries directory using the OS name followed by the abbreviation for the processor architecture. Here are some examples: win32-x86 linux-x86 linux-ppc solaris2-x86 solaris2-sparc.
9.4
Building the Result Submission Tools
The submission tools and associated files are located in the submit_tools subdirectory under the <install_dir> directory.
To build the SPEC SFS submit tools, you must load the J2SE(TM) Development Kit release 5.0 or later on the system where you want to build the java code. Update paths in the build script if needed.
To build the submit tools, enter the following:
cd $SPEC/submit_tools
make
Mac OS X Note:
Under Mac OS X, you must install the expat and XML-Parser libraries.
These are located under $SPEC/redistributable_sources as
* expat-2.0.0.tar.gz
* XML-Parser-2.34.tar.gz
10 Appendix B – Setting up password-less
ssh
Here
is a sample script that can be used to set up password-less ssh on Linux
clients.
#
Define the hosts to be involved in the trust here
# DO
NOT include the host you are running, it is added by default
hosts="s2
s3 s4 s5 s6"
echo
""
echo
""
echo
"This script will generate SSH keys for the specified machines,"
echo
" and set up password-less authentication between them."
echo
" You will be prompted for passwords several times during this
process."
echo
""
# Get
current user
user=`who
-m | awk {'print $1'}`
echo
"Trust will be configured for user $user"
echo
""
echo
"If this is not correct, stop and login as the appropriate user"
echo -n
"(RETURN to continue, CTRL-C to exit) "
read
continue
#
Configure keys on current host
cd $HOME
ssh-keygen -t rsa
cat
.ssh/id_rsa.pub >> .ssh/authorized_keys
chmod
700 .ssh
chmod
600 .ssh/*
for
host in $hosts
do
ssh $user@$host
'ssh-keygen -t rsa'
ssh
$user@$host 'cat .ssh/id_rsa.pub' | cat - >> ~/.ssh/authorized_keys
done
for
host in $hosts
do
scp .ssh/authorized_keys $host:.ssh
ssh $user@$host 'chmod 700 .ssh ; chmod 600
.ssh/*'
done
exit