Getting Started

        Here are the basic steps necessary to prepare your GLperf data for graphing. Be sure to verify that your data is present in the Benchmark Visualizer for GLperf (the Java front-end). If you experience problems, have questions or requests please contact Bob Penrod at Silicon Graphics (bpenrod@sgi.com). If you're reporting a (potential) bug, please include as much information as possible (sending error output from your browser's Java console is best).

The Basic Steps
1. Download and install the glperf_viz.tar.gz (or glperf_viz.zip) archive [See Download and Installation]
2. Run glperf2graph.pl for all the data you want to graph. [See Data Directory Structure]
3. Create your configuration files. [See Configuration Files]
4. Configure your web pages. [See Web Site Structure]
5. View your data! [See The User Interface]


Download and Installation

        You may obtain a copy of the glperf_viz.tar.gz (or glperf_viz.zip) archive from http://reality.sgi.com/bpenrod/portfolio/GLperf/index.html. This and further documentation as well as updates are also available there. This package needs to be installed in a directory accessible from your Web server. You may need to seek assistance from your webmaster if you don't know how to get a path from your server. The Perl scripts contained in this distribution require Perl5. You may need to modify the Perl executable string at the beginning of the script if the path to your Perl5 executable differs. Don't forget to also modify sqlproxy.cgi if necessary.


Data Directory Structure

        The glperf2graph.pl script assumes a directory structure that is hierarchical by vendor then by configuration (see the figure below). Each configuration directory is required to have two things present before the script is run: 1. a directory called "output" containing the raw GLperf output data 2. a file called "config.data" that contains a key/value pair list of general information about the configuration.

Structure Example

        Usage for glperf2graph.pl has the following form:

	./glperf2graph.pl [-suffix <suffix>] <vendor directory> <config directory>
square brackets indicate optional arguments. Consider the example in the figure above. In order to parse the data for the O2 180 MHz R5000 SC, you would issue the following command:
	./glperf2graph.pl SGI O2_R5k.SC
if you had named the raw output files with the suffix ".results.summary" (i.e. LineFill.rgb.results.summary), you would issue
	./glperf2graph.pl -suffix .results.summary SGI O2_R5k.SC
glperf2graph.pl assumes the suffix to be ".sum" if omitted. glperf2graph.pl will simply take "*<suffix>" as your raw data files. Therefore, you may use only one monolithic file or as many as you like.

        Each vendor configuration's "config.data" is currently only used in the creation of the "summary.html" file. The structure of "config.data" is shown below:

Vendor System Model : <anything followed by a newline>
Graphics Accelerator : <anything followed by a newline>
CPU : <anything followed by a newline>
Memory : <anything followed by a newline>
Price : <anything followed by a newline>
(actually, all lines of this form in "config.data" will be used as configuration detail in "summary.html")

        "summary.html" is a simple tabular HTML listing of all the configuration's results. The keys and values from "config.data" are listed at the top of the document.


Configuration Files

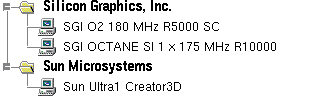
        In the main data directory (the root of the graphs above), there are three configuration files used by the Java libraries that determine the structure of the tests and configurations made available in the interface. They are "configurations.index", "GLperf_Basic.index", and "OPClist.index". Both "GLperf_Basic.index", and "OPClist.index" are provided for you in the Benchmark Visualizer for GLperf package. Their structure is identical to "configurations.index" which you must provide. These files use the standard HTML tags <UL> (unordered list) and <A HREF...> (hypertext reference) to describe an arbitrary hierarchical list (see the figure below). The only constraints placed on the structure of this file are that it must conform to valid HTML syntax for <UL> and <A HREF...> and that the HREFs must end in a forward slash ("/") (to indicate to the Browser widget that the reference is to a directory of graphable data).

Sample configurations.index File
<UL>
  <LI> Silicon Graphics, Inc.
  <UL>
    <LI> <A HREF = "SGI/O2_R5k.SC/graph/">SGI O2 180 MHz R5000 SC</A>
    <LI> <A HREF = "SGI/Octane_SI.175/graph/">SGI OCTANE SI 1 x 175 MHz R10000</A>
  </UL>
  <LI> Sun Microsystems
  <UL>
    <LI> <A HREF = "Sun/ultra1/graph/">Sun Ultra1 Creator3D</A>
  </UL>
</UL>
	
Generated Tree
there is a utility included in the distribution called make_basic.pl that will generate "GLperf_Basic.index" and "OPClist.index" for you (it will also regenerate the GLperf Basic Tests data files from their summaries). You are free to add or remove entries from any of the .index files to customize what data is presented to the user.

        HINT: To include an index of links to the generated summary files, you can cut and paste "configurations.index" into main.html (since it's valid HTML), make some slight modifications, and you have a nice hierarchical index to the summaries.


Web Site Structure

        In order to view the data and graphs for which you've run glperf2graph.pl, you must place the Java libraries and above data directory structure in a path accessible from your Web server. A Web server is required since data is acquired by the libraries using HTTP connections hosted by the server. For simplicity, I suggest the structure provided in the archive:

<your glperf_viz dir>/
	data/		<== the above glperf2graph-ified directory tree
	classes/	<== the Java libraries (untared or unzipped)
	index.html
	main.html	<== has an <APPLET> tag for Java applet(s)
	empty.html

        There are two main interfaces in the Benchmark Visualizer for GLperf: the "DataBrowser" (encapsulating the basic GLperf tests) and the "OPCBrowser" (the OPClist tests). To gain access to these interfaces, you need a Web page with an <APPLET> tag that activates an interface. Here are the standard distribution tags:

<APPLET CODE = StartButton.class CODEBASE = "classes" WIDTH = 225 HEIGHT = 75>
<PARAM NAME = "WINDOWTYPE" VALUE = "DataBrowser">
<PARAM NAME = "DATADIR" VALUE = "data">
<PARAM NAME = "BUTTONTEXT"  VALUE = "GLperf Basic...">
<PARAM NAME = "BUTTONIMAGE" VALUE = "GLperfLogo.gif">
</APPLET>
<APPLET CODE = StartButton.class CODEBASE = "classes" WIDTH = 225 HEIGHT = 75>
<PARAM NAME = "WINDOWTYPE" VALUE = "OPCBrowser">
<PARAM NAME = "DATADIR" VALUE = "data">
<PARAM NAME = "BUTTONTEXT"  VALUE = "OPC List...">
<PARAM NAME = "BUTTONIMAGE" VALUE = "GLperfLogo.gif">
<PARAM NAME = "SQLPROXY"   VALUE = "http://<your Web server>/<path to distribution>/data/sqlproxy.cgi">
</APPLET>

        The StartButton applet simply configures the interfaces (the browsers) and opens up their windows. You will need one <APPLET> tag (one button on the page) for each. The parameters accepted by the applet are:

Parameter Description Values
WINDOWTYPE the type of window to create [required] either DataBrowser or OPCBrowser
DATADIR the relative path to the data directory [required] your directory name (i.e. data)
SQLPROXY the absolute URL to the SQL proxy script (sqlproxy.cgi) [for OPCBrowser only; required] You must supply the absolute URL to the sqlproxy.cgi script
ex: http://reality.sgi.com/bpenrod/portfolio/GLperf/data/sqlproxy.cgi
BUTTONTEXT the text to appear on the applet button [optional]
BUTTONIMAGE the image to appear on the applet button [optional] GLperfLogo.gif is provided for you